Have you ever wanted to build your own website but had no idea where to start? You are not alone. Thousands of people sit in front of a blank browser every day, thinking the same thing: “Is this going to be too technical? Too expensive? Too complicated?” The good news is — it is not. Not anymore.
Creating a WordPress website has become one of the easiest ways to get online. Whether you want to start a blog, launch an online store, showcase your portfolio, or build a business website, WordPress gives you the tools to do it — even if you have never written a single line of code in your life.
In this guide, you will learn exactly how to create a WordPress website from scratch, step by step. By the time you reach the end, you will have a fully functional website ready to share with the world.
Let’s get started.
What Is WordPress and Why Should You Use It?
Before we dive into the steps, let’s quickly understand what WordPress actually is. WordPress is a content management system — or CMS — that powers over 43% of all websites on the internet. That is almost half the web. From small personal blogs to massive news sites like The New York Times, WordPress handles them all.
Here is why so many people choose WordPress:
- It is free and open-source
- Thousands of free themes and plugins are available
- No coding skills are required to get started
- It is SEO-friendly right out of the box
- It works for any type of website — blogs, shops, portfolios, and more
- A massive global community supports it with tutorials, forums, and updates
One quick thing to note: There is WordPress.com and WordPress.org. They sound the same but work very differently. WordPress.org is the self-hosted version — and that is what this guide is about. It gives you full control over your website, your data, and your earnings. WordPress.com is a hosted service with more restrictions. For a professional WordPress website, always go with WordPress.org.
What You Need Before You Start
Creating a WordPress website requires just two basic things. You need a domain name and a web hosting plan. Think of it this way: the domain name is your website’s address (like www.yoursite.com), and hosting is the plot of land where your website lives on the internet.
Here is what to prepare:
- A domain name (usually costs $10–$15 per year)
- A web hosting plan (starts from as low as $2.95/month)
- An email address to register accounts
- A rough idea of what your website will be about
- About 30–60 minutes of your time
That is it. You do not need a degree in computer science. You do not need to hire a developer. Let us walk through each step now.

Step-by-Step Guide to Creating a WordPress Website
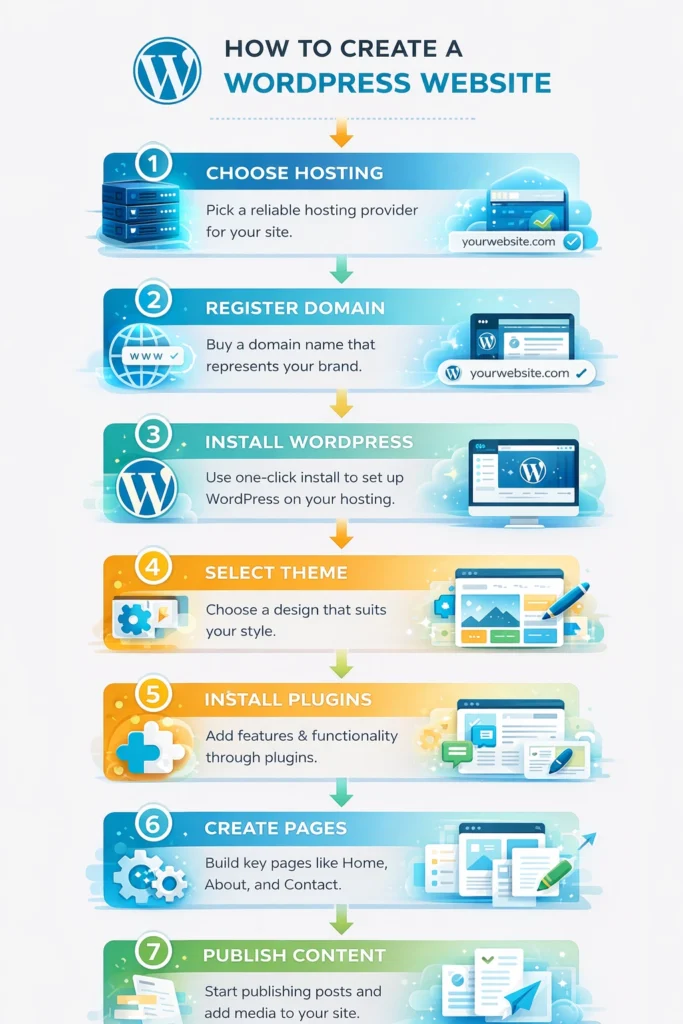
Step 1: Choose a Reliable Web Hosting Provider
Your hosting provider is the foundation of your WordPress website. A bad host means slow load times, frequent downtime, and unhappy visitors. For beginners, we recommend going with a beginner-friendly host that also offers one-click WordPress installation.
Top hosting options for WordPress beginners:
- Bluehost – Officially recommended by WordPress.org. Great value, easy setup.
- SiteGround – Excellent speed and customer support.
- Hostinger – Budget-friendly with solid performance.
- DreamHost – Another officially recommended WordPress host.
Pro Tip: Many hosting providers offer a free domain name for the first year when you sign up. Take advantage of this deal to save some money.
When picking a plan, go with shared hosting to start. It is affordable and more than enough for a new website. You can always upgrade later as your traffic grows.
Step 2: Register a Domain Name
Your domain name is your online identity. It is what people type in their browser to find you. Choose something short, easy to remember, and relevant to your topic or brand.
Tips for choosing a domain name:
- Keep it short — ideally under 15 characters
- Avoid numbers and hyphens — they confuse people
- Use .com if possible — it is the most trusted extension
- Make it easy to pronounce and spell
- Avoid trademarked brand names
You can register your domain through your hosting provider (if they include it for free) or through a separate registrar like Namecheap or Google Domains. Once you register it, that name is yours for as long as you renew it each year.
Step 3: Install WordPress on Your Hosting Account
This is where the magic starts. Most modern hosting providers let you install WordPress with just a few clicks. You do not need to download any files or mess with any code.
Here is how to install WordPress:
- Log in to your hosting control panel (usually called cPanel)
- Look for the “WordPress” or “Softaculous” installer
- Click “Install Now”
- Fill in your site name, username, and password
- Click “Install” and wait for the process to finish
Pro Tip: Write down your WordPress admin username and password somewhere safe. You will need these to log in to your site every time.
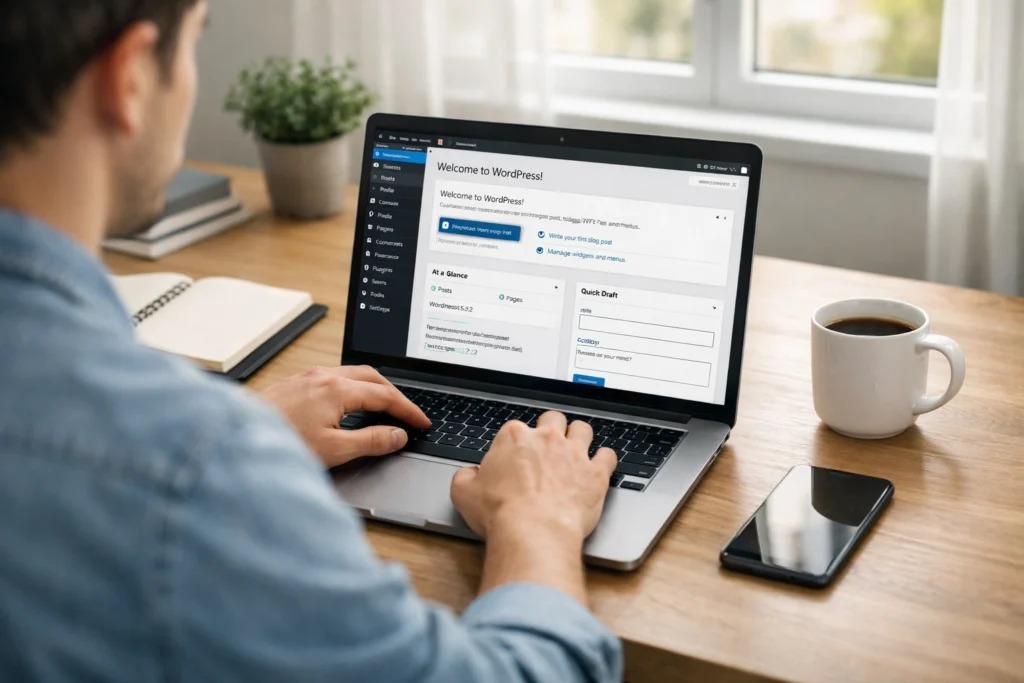
Once installed, you can access your WordPress dashboard by going to yourdomain.com/wp-admin. This is your website’s control centre.
Step 4: Get Familiar with the WordPress Dashboard
The WordPress dashboard is where you will manage everything on your WordPress website. At first, it might look a little overwhelming — but do not worry. It gets easier very quickly.
Key areas of the WordPress dashboard:
- Posts – Where you write and manage your blog posts
- Pages – Where you create static pages like About, Contact, and Home
- Appearance – Where you change your site’s design and layout
- Plugins – Where you add new features and tools
- Settings – Where you configure your site’s general options
- Media – Where you upload and manage images and files
Spend a few minutes just clicking around and exploring. You will not break anything, and the more you explore, the more comfortable you will feel.
Step 5: Choose and Install a WordPress Theme
Your theme controls how your WordPress website looks. The good news is that WordPress has thousands of free themes available, and changing your theme takes less than a minute.
How to install a WordPress theme:
- Go to Appearance > Themes in your dashboard
- Click “Add New”
- Browse or search for a theme you like
- Click “Install” and then “Activate”
Popular free themes for beginners:
- Astra – Lightweight, fast, and highly customisable
- OceanWP – Great for various types of websites
- GeneratePress – Known for speed and clean design
- Kadence – Beginner-friendly with great starter templates
Pro Tip: Look for themes that are “responsive” — this means they automatically adjust to look great on mobile phones and tablets, which is critical for SEO rankings.
Once your theme is activated, go to Appearance > Customise to change colours, fonts, your logo, and other visual elements without touching any code.
Step 6: Install Essential WordPress Plugins
Plugins are like apps for your WordPress website. They add features that WordPress does not include by default. There are over 59,000 free plugins in the WordPress repository, so you can find something for almost anything.
Here are the must-have plugins for every new WordPress site:
- Yoast SEO or Rank Math – To optimise your content for search engines
- Wordfence Security – To protect your site from hackers
- UpdraftPlus – To automatically back up your site
- W3 Total Cache or WP Super Cache – To speed up your website
- Contact Form 7 – To add a contact form to your site
- Smush – To compress and optimise images automatically
How to install a plugin:
- Go to Plugins > Add New in your dashboard
- Search for the plugin by name
- Click “Install Now” and then “Activate”
Troubleshooting Tip: Only install plugins you actually need. Too many plugins can slow down your site and cause conflicts. If a plugin causes issues, deactivate it first before deleting.
Step 7: Create Your Essential Website Pages
Every WordPress website needs a few core pages before you start publishing content. These pages build trust with your visitors and are also required for Google AdSense approval.
Pages every website should have:
- Home Page – The first thing visitors see when they land on your site
- About Page – Who you are, what your site is about, and why people should trust you
- Contact Page – How people can get in touch with you
- Privacy Policy Page – A legal requirement, especially if you collect any user data
- Disclaimer Page – Important if you publish content or earn through affiliate marketing
To create a page, go to Pages > Add New. Use the WordPress block editor (also called Gutenberg) to add text, images, buttons, and other elements. It is drag-and-drop simple.
Step 8: Set Up Your Navigation Menu
A navigation menu helps visitors explore your WordPress website easily. Without one, people will not know where to go — and they will leave.
How to create a navigation menu:
- Go to Appearance > Menus
- Click “Create a new menu” and give it a name
- Add the pages you want to appear in the menu
- Choose where to display it (usually “Primary Menu”)
- Click “Save Menu”
A typical top navigation menu should include links to your Home, About, Blog, and Contact pages. Keep it clean and simple — do not add too many items.
Step 9: Write and Publish Your First Blog Post
Now comes the fun part. It is time to publish some content on your WordPress website. Blog posts are what will drive traffic from Google and other search engines.
How to write and publish a post:
- Go to Posts > Add New
- Write a catchy title for your post
- Add your content using the block editor
- Add a featured image (this is the main image shown with your post)
- Add categories and tags to organise your content
- Fill in the SEO title and meta description using your SEO plugin
- Click “Publish”
Pro Tip: Write posts that answer real questions your audience is searching for. Use tools like Google Keyword Planner or Ubersuggest to find topics that people are actually looking up.
Step 10: Configure Important WordPress Settings
Before you start driving traffic to your WordPress website, make sure your settings are properly configured. These are small but important tweaks that can have a big impact on your site’s performance and SEO.
Important settings to check:
- Permalinks – Go to Settings > Permalinks and choose “Post Name” for cleaner, SEO-friendly URLs
- Reading Settings – Set your homepage display and decide how many posts to show per page
- Discussion Settings – Control how comments work on your site
- Site Title and Tagline – Go to Settings > General to update your site name
- Time Zone – Set this to your local time zone, so your post timestamps are correct
How to Customise Your WordPress Website Further
Once your basic WordPress website is up and running, there is a lot more you can do to personalise it and make it stand out.
Customisation ideas:
- Add a custom logo — Go to Appearance > Customise > Site Identity
- Change your colour scheme to match your brand
- Add a sidebar with popular posts, social media links, or a newsletter signup box
- Install a page builder like Elementor to design pages visually
- Set up Google Analytics to track your website and visitors
- Connect your site to Google Search Console to monitor your SEO performance
Remember, a great WordPress website is never really “finished.” You keep improving it as you grow. Start simple, get the basics right, and build from there.
Common WordPress Problems and How to Fix Them
Even experienced developers run into issues sometimes. Here are some of the most common problems beginners face when managing a WordPress website — and how to solve them.
White Screen of Death (WSOD)
This happens when a plugin or theme causes a fatal error. Fix it by deactivating all plugins via your hosting file manager (rename the plugins folder), then reactivating them one by one to find the culprit.
Locked Out of Your Dashboard
If you forget your password, click “Lost your password?” on the login page. If that does not work, you can reset it through your hosting control panel using phpMyAdmin.
Slow Website
A slow site drives visitors away and hurts your SEO rankings. Install a caching plugin, optimise your images, and choose a quality hosting provider. Also, check if you have too many active plugins.
Images Not Uploading
This is usually a file permission issue. Contact your hosting support or use your file manager to set the uploads folder permissions to 755.
404 Errors on Pages or Posts
Go to Settings > Permalinks and simply click “Save Changes” without making any edits. This refreshes your site’s URL structure and usually fixes 404 errors instantly.
Frequently Asked Questions (FAQs)
1. Is creating a WordPress website free?
WordPress itself is completely free to download and use. However, you will need to pay for a domain name (around $10–$15 per year) and web hosting (starting from about $2.95 per month). Many themes and plugins are also free, though premium versions with extra features are available at a cost.
2. How long does it take to create a WordPress website?
A basic WordPress website can be up and running in as little as 30 to 60 minutes. Of course, the more customised and content-rich you want it to be, the more time it will take. Many bloggers spend a few hours getting everything set up before publishing their first post.
3. Do I need coding skills to build a WordPress website?
No, you do not need any coding skills at all. WordPress is designed for non-technical users. The drag-and-drop block editor, visual theme customiser, and thousands of plugins let you build and manage a professional website without touching a single line of code.
4. What is the difference between WordPress.org and WordPress.com?
WordPress.org is the self-hosted, open-source version that gives you complete control over your site. You can install any theme or plugin, monetise your site however you want, and own all your data. WordPress.com is a hosted service with more restrictions on customisation and monetisation. For a professional WordPress website, WordPress.org is the recommended choice.
5. Can I make money from my WordPress website?
Absolutely. There are many ways to earn from a WordPress website. You can display ads through Google AdSense, promote products via affiliate marketing, sell digital or physical products with WooCommerce, offer online courses, or accept freelance bookings. Many successful bloggers and online business owners generate a full-time income from their WordPress sites.
Conclusion: Your WordPress Website Journey Starts Now
Building a WordPress website is one of the best decisions you can make if you want to share your ideas, grow a business, or create a new income stream online. As you have seen in this guide, the process is not as scary as it looks. With the right tools and a clear plan, anyone can do it.
To recap what we covered:
- Choose a reliable hosting provider
- Register your domain name
- Install WordPress in minutes
- Set up your theme and plugins
- Create your essential pages
- Start publishing great content
- Keep improving and growing your site
The hardest part is just getting started. Once your WordPress website is live, you will be amazed at how quickly you learn and improve. Do not wait for everything to be perfect — launch it, learn from it, and keep going.
Ready to build your WordPress website today? Pick your hosting plan, register your domain, and follow the steps in this guide. Your first website is just a few clicks away.
If you found this guide helpful, share it with a friend who is also thinking about starting a website. And if you have any questions, drop them in the comments below — we would love to help!